Monday, December 31, 2012

Penistone Railway Works: Open For Business

As you may remember I've recently become a convert to the wonders of 3D printing. First I printed a spark arrestor for an L&YR "Pug", and more recently I printed up a set of four Train Protection Warning System grids to hide the sensors for my scale speed trap. What I learnt from this was that, firstly, I'm better at building 3D models than I thought I was, and more importantly, that the results are actually usable. This has really got my creative juices flowing and I now have a bunch more ideas that I'm working on that will hopefully turn into more printed objects.

It seems a shame though to keep these models to myself -- I don't know if anyone else will find them useful but I won't know unless I make them available. So as of today Penistone Railway Works is officially open for business! Essentially this is just a shop front as Shapeways handles all the transactions, however, it provides a nice focus point and will allow me to branch out in the future to use other printers or manufacturing processes. Feel free to have a browse, and let me know if you spot any problems that need ironing out.

Sunday, December 9, 2012

Hidden In Plain Sight

Whilst I was more than happy with the performance of the scale speed trap I built back in August, I wasn't happy with how it looked. Whilst most of the electronics can be hidden out of the way the light dependent resistors (LDRs) have to be on the track somewhere. Whilst I had chosen fairly small and flat LDRs they were still quite large and unsightly. To have any chance of hiding them I would have needed to place them below the sleepers which would have permanently covered part of the working surface. So if I want to add the speed trap to a nicely modelled layout I have to find a way of fitting and hiding the LDRs.

Fortunately it turned out to be easy to find LDRs that were a better fit to the track; the VACTEC - VT935G are a push fit between the sleepers and cost me just 70p each (with a pull-down resistor included) from oomlout. This just left the small problem of how to disguise the LDRs on a layout.

When I catch the train to work I have to cross the tracks to reach the Sheffield bound platform. Right next to the crossing is a signal and, as with many signals, it is fitted with a Train Protection Warning System (TPWS). A full TPWS consists of four grids positioned at set distances from the signal. Firstly there is an Overspeed Sensor System (OSS) which uses two grids a short distance apart to determine the speed of a train approaching a signal. If the train is travelling two fast then the breaks are automatically applied. The second half of the system is a Train Stop System (TSS) which consists of two grids next to each other positioned at the signal which are triggered by any movement of the train. You can find full details of how TWPS works at this interesting web page.

While a TSS would probably place the two LDRs too close together, using two separate grids as an OSS to hide the LDRs seemed like a perfect way of hiding the electronics in plain sight. Now PECO do make TPWS grids in the right scale, but when I looked into these I felt that they were a little chunky for my liking. In reality, from anything other than close to, the grids actually look more like a set of parallel bars as the thin ties aren't really visible. The problem is that modelling such thin bars at 4mm to the foot scale would result in very very fine plastic bars -- too fine to model accurately and as a result the are oversize on the PECO grids.

Having had some success with 3D printing, I decided to have a go at creating my own TPWS grids. The simple structure was easy to model and has printed really well. While I chose to leave out the thin tie bars completely, I'm quite happy with the look of the resulting grids, and they are a perfect size to hide the LDRs from view. Once the track is properly ballasted and the grids are painted it should all come together nicely.

Friday, November 16, 2012

The Apocryphal Cow

I find Wikipedia to be a useful jumping off point when looking something up, but, as I've often told students, it really isn't to be treated as a trusted resource, and should never appear in the references section of an academic work. As an example of why this is true I present to you the tale of the apocryphal cow.

When we first moved to Penistone I knew nothing about the areas history. It was clear though from my first commute on the train that there used to be a lot more railway lines and infrastructure than the single remaining line between Barnsley and Huddersfield. After a quick session with Google I'd found quite a lot of interesting information, including this Wikipedia page which details a number of railway accidents that have occurred in and around Penistone.

As with many Wikipedia articles this one doesn't go into lots of details about each accident, mostly just providing a short summary for each one. My interest, however, had been piqued and so I've been slowly looking into each accident to find out more, and there may well be more blog posts on this subject in the future. This post focuses on the first accident which occurred in 1845, the year the first line to Penistone opened. The Wikipedia article currently states that:

In one of the promotional meetings for the Sheffield, Ashton-under-Lyne and Manchester Railway a local farmer asked George Stephenson "what would happen if one of your locomotives hit one of my cows." Stephenson is reputed to have replied in a very broad, almost incomprehensible Geordie (Newcastle area) accent, "I would'na gi much chance for the coo!" At that time, Penistone Station was set on the line just below the parish church, which was adjacent to the cattle market. (The station was moved to the present site with the opening of the line to Huddersfield).

On 6 October 1845, Stephenson's thoughts were put to the test. The evening train from Dunford Bridge to Sheffield was running down the gradient towards Penistone Station when the train met a cow which had escaped onto the railway track from the cattle market. The drover was unable to move it out of the way and the train hit the cow. The locomotive and coaches were derailed and damaged, the guard injured and passengers shaken but Stephenson was proven right; the cow was almost cut in two and killed on the spot.

The accident took place on the line towards Dunford Bridge, somewhere in the Bullhouse area and was considered to be caused by "Cattle Drover's neglect".
Now while I find this interesting there were a number of things in this short description that started to ring alarm bells.

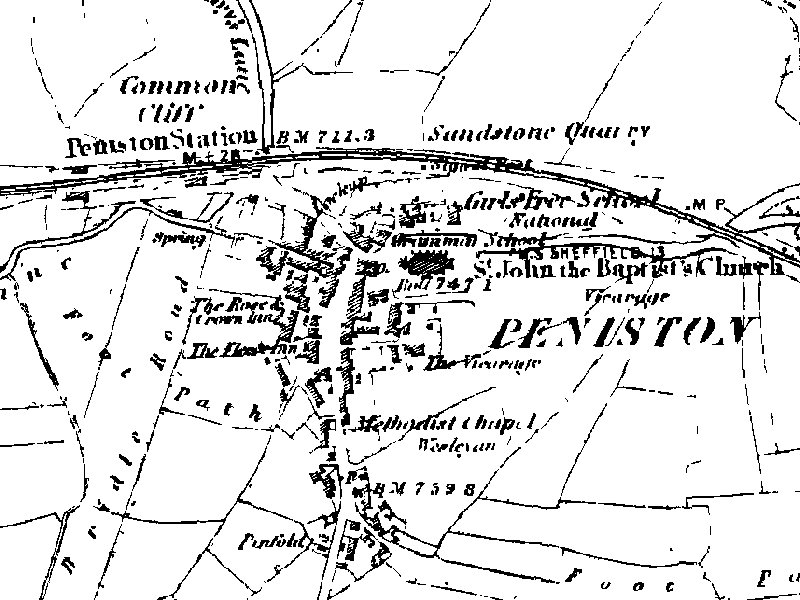
Firstly I couldn't see how there would be room alongside the old line (the accident occurred on the Woodhead Line which was closed in 1981 with the track being lifted a few years later) for a station building, however small, to have been built. Most of the track bed below the Church is on a narrow raised embankment and includes a bridge. Fortunately I was able to find a map from 1851 which shows the original location as being west of the Church, next to the still existing Penistone showground, which is where I assume the cattle market was held in 1845.

Knowing where the station was doesn't help me pinpoint the site of the accident though. Firstly the article states that the cow ... had escaped onto the railway track from the cattle market and that it happened somewhere in the Bullhouse area. The problem is that Bullhouse is around 2 miles along the line from the old station and cattle market (the old line is now the Trans-Pennine Trail, and on Google Maps this is a cycle way, so you can easily calculate the distance). While I'm sure that cows can roam a long distance, I would assume that if one had escaped from the cattle market it would have been captured well before it had managed to get 2 miles or more up the line.

The second problem with the Wikipedia description is that it mentions George Stephenson being involved with a promotional meeting for the Sheffield, Ashton-under-Lyne and Manchester Railway (SA&MR). As far as I can tell while Stephenson was involved in the plans for the original Sheffield and Manchester Railway, which was never built, I can't find him being involved with the SA&MR. That isn't to say he wasn't at a promotional meeting but at this point I was beginning to wonder if any of the Wikipedia description was at all accurate.

As I stated at the beginning of this post, while I don't class Wikipedia as a trusted resource I do find it a useful jumping-off-point, and in this case a single reference was given for this accident; page 52 of George Dow's 1959 book Great Central. Volume One: The Progenitors 1813-1863. Working in a University with a good library can be very useful and after wondering around the stacks I eventually located the book. The relevant passage reads as follows:

Nevertheless, the Sheffield--Dunford Bridge section did sustain one series accident during its period of physical isolation from the older part of the SA&M, this nearly disproving George Stephenson's classic observation that in the event of a collision between a train and a cow "it would be very awkward for the coo". Soon after leaving Dunford Bridge on the evening of 6th October 1845 a passenger train ran into a cow which had strayed on the line owing to the negligence of a drover from Penistone market. The locomotive and all the carriages were derailed and damaged, severely injuring the guard and thoroughly shaking up the passengers. The cow was almost cut in two and killed on the spot.
Dow wrote this over 100 years after the accident, but he references a contemporary source; the 11th of October 1845 issue of The Illustrated London News. After a lot of hunting around I managed to get my hands on an electronic copy, and the news article reads as follows:

Accident on the Sheffield and Manchester Railway.--Owing to a cow having negligently been allowed to stray on to the above line, by a drover from Penistone market, after dark, on Monday night, an accident occurred, which had well nigh been the destruction of a whole train of passengers. Shortly after the train had left Dunford bridge, and while it was dark, a shock was received which threw both engine and train off the line, seriously injuring several of the carriages, and almost crushing the guard to death. As soon as the passengers could be got out of the carriages, it was ascertained that a cow had got upon the line, and the engine had come in violent contact with it. The poor animal was nearly cut in two, and, of course, killed on the spot. Information was immediately sent to Sheffield station, and a pilot engine promptly dispatched at ten o'clock at night. It returned at midnight with a portion of the passengers upon the tender, and immediately on setting them down, started again for the remainder, with Sufficient carriages, arriving again at Sheffield about two in the morning. The passengers, who, as might be expected, were much alarmed, bore the inconvenience with considerable fortitude--not a syllable of complaint being uttered by any of them. Happily none of the passengers were injured beyond some slight bruises, and all reached their homes in safety, between midnight and two o'clock on Tuesday morning.
Both of these reports agree on a number of issues. Firstly it would seem that the accident occurred shortly after leaving Dunford Bridge, and neither claim that the cow had escaped from Penistone cattle market. Both of these facts differ from the Wikipedia article, and given the contemporary report are more likely to be correct. I think the escaped cow probably comes from misreading that it was the drover involved who was from Penistone market, and not the cow.

The journey from Dunford Bridge to Penistone is about 5.5 miles, and according to the August 1845 issue of Bradshaw's Monthly Railway and Steam Navigation Guide (the relevant excert is shown on page 53 of Dow's book) took 12 minutes. The 6th of October 1845 was a Monday, and as sunset was at approximately 17:15 (I used SpectralCalc.com to determine sunset for Penistone), then it must have been either the 18:07 or 20:07 departure from Dunford Bridge that was involved in the accident. Given that, according to the timetable, it would normally take 45 minutes for the train to make the entire journey from Dunford Bridge to Sheffield, and the newspaper article states that "and a pilot engine promptly dispatched at ten o'clock at night" then I would assume that it was the 20:07 departure, giving almost two hours after the accident for news to reach Sheffield.

From the original Wikipedia article, the one outstanding issue is George Stephenon's response to the question: what would happen if one of your locomotives hit one of my cows? Interestingly Dow refers to Stephenson's response as a "classic observation" and makes no attempt to link it to the SA&MR.

It would appear that the quote has nothing to do with the SA&MR but was actually from a parliamentary committee investigation into the proposed building of the Liverpool and Manchester railway. In 1884 Grant Allen published a book entitled Biographies of Working Men. Chapter 2 was devoted to George Stephenson and contains the following passage:

A long and severe fight was fought over the Liverpool and Manchester railway, and it was at first doubtful whether the scheme would ever be carried out. ... Stephenson himself was compelled to appear in London as a witness before a parliamentary committee ... One of the members of the committee pressed Stephenson very hard with questions. "Suppose," he said, "a cow were to get upon the line, and the engine were to come into collision with it; wouldn't that be very awkward, now?" George looked up at him with a merry twinkle of the eye, and answered in his broad North Country dialect, "Oo, ay, very awkward for the COO."
A similar story is also reported in Oscar D. Skelton's 1916 book The Railway Builders.

The directors of the new [Liverpool and Manchester] railway had found great difficulty in obtaining a charter from parliament. ... What would become of coachmen and coach-builders and horse-dealers? 'Or suppose a cow were to stray upon the line; would not that be a very awkward circumstance?' queried a committee member, only to give Stephenson an opening for the classic reply in his slow Northumbrian speech: 'Ay, varra awkward for the coo.'
Having finally tracked down the quote, I think I can now safely state the following:

  • the accident occurred just after leaving Dunford Bridge
  • the train hit a cow that a drover from Penistone market hadn't been able to clear from the line
  • the cow was killed instantly, giving proof to George Stephenson's classic answer to a parliamentary committee that such an accident would be "very awkward for the coo"

So with these facts in hand I'm intending to re-write the Wikipedia article as follows:

During a parlimentary committee meeting to debate the building of the Liverpool and Manchester railway, George Stephenson was asked what would happen should a train hit a cow. His now classic reply, given in his broad Northumbrian dialect, was to state "Oo, ay, very awkward for the COO!".

On the evening of the 6th of October 1845 this assumption was dramatically put to the test. Shortly after leaving Dunford Bridge the Sheffield bound train struck a cow, which a drover from Penistone market had been unable to remove from the line. The impact caused the locomotive and carriages to derail and the cow was killed instantly. Such was the force of the accident that the cow was almost entirely cut in half.

None of the passengers suffered any injuries other than some minor bruising, although the guard was more severely injured. A replacement train was dispatched from Sheffield and the passengers all completed their journey by two o'clock the following morning.
I think that this is much more accurate description of the accident and unless anyone points out any obvious mistakes in the next day or so, I'll update the Wikipedia article.

Any well researched article should always end with a list of sources, so here are the full details of the items quoted above:
  • Grant Allen. Biographies of Working Men. 1884.
  • Frederick William Naylor Bayley, editor. The Illustrated London News. William Little, 11 October 1845.
  • George Dow. Great Central, Volume One: The Progenitors, 1813–1863. Ian Allan, 1959.
  • Oscar D. Skelton. The Railway Builders. 1916.

Tuesday, November 13, 2012

As Near As Makes No Difference

When I started this blog I mentioned that the posts would be "a mixture of historical posts, based on what I'm learning about Penistone as well as my Dad's slides, modern trips to preserved railways, and some modelling". So far most of the posts have been about modelling, but I've recently started to do some more in depth research for a sequence of historical posts. I'm still quite a way from having any of those posts ready, but while hunting out a few details I came across an interesting photo that I thought worth sharing.

This photo shows Cammell Laird's Penistone steelworks. The factory closed in 1930 and was eventually completely demolished. The site was eventually re-developed with the building of a housing estate; a housing estate in which we bought a house. That, however, wasn't why I found the photo interesting.

Some of you may remember that my first recent foray into railway modelling was the construction of a couple of open coal wagons, both of which were finished with transfers for local collieries. The second wagon depicted an 8 plank, 12 ton open coal wagon belonging to the Dodworth branch of Old Silkstone colliery. Given that Silkstone Common is the first stop south on the railway from Penistone, I'd assumed that the Old Silkstone wagon would have been a familiar sight in Penistone, but I'd yet to see any actual proof.

Now if you look closely at the photo you should be able to see that the third wagon from the left is an Old Silkstone wagon.


Strangely the relative sizes of the lettering is different from the model I built, but this is good enough proof for me that the wagon definitely represents something that would have regularly been seen in and around Penistone.

Saturday, November 10, 2012

Brass Knobs

After finishing the smokebox door I was going to take a small break from modelling, but I made the mistake of leaving the bits sat on my desk. It turns out that they were way too enticing to leave alone.

Just like the handrails on the cab sides, the moulded version that ran around the boiler was fairly horrid looking, but improving this handrail was going to be a bit more involved though; I was going to need some handrail knobs.

Fortunately along with the smokebox door handles I'd ordered a set of medium brass handrail knobs from Eileen's Emporium. So just like with all the other improvements I drilled holes for each handrail knob and then cut away the moulded version. Fitting the new handrail knobs was more difficult though. I used a small offcut of brass wire to fit and align the knobs down each side of the boiler. I then formed a piece of brass wire into the right shape to fit around the boiler. On to this wire I threaded the final handrail knob which fits above the smokebox door. The wire was then threaded into each pair of handrail knobs one at a time, until it was in position and the final knob could be slipped into the hole. For a first attempt I'm really happy with it, although the photo shows that the wire has ended up quite badly kinked. Fortunately this doesn't real show when looking at the actual model.

The eagle eyes amongst you may also notice that I've trimmed the smokebox door handles slightly. I felt that they were a little long, and I also wanted them to be slightly different lengths to better match the original moldings.

Smokey Darts

So having improved the cab side hand rails yesterday, today I turned to improving the smokebox door handles. The technique was essentially the same; drill a hole (using 1.2mm drill bit), cut off the plastic moulding, and then add the new handles.


The final result is, I think, a lot better than the original moulding. Now while I could have made up the smokebox darts (why the door handles are called darts I don't really know) from brass wire, I decided that would be pushing things slightly so instead I bought a ready made set from Eileen's Emporium (where I also bought the brass wire for the hand rails). They actually come as three separate pieces which means you can easily position the hands in any orientation you want. The downside is that they are very small pieces of brass that require rather good eyesight to fit together. It took me a couple of attempts to get them on right, but I think it was worth the effort.

You'll have noticed that I've also drilled a hole and cut off the moulded hand rail across the top of the smokebox door, but fitting that around the boiler will have to wait for another post.

Friday, November 9, 2012

Brass Hand Rails

One of the first improvements I've tried while building the static Dapol pug kit, which I talked about in the previous post, has been to replace the hand rails on the cab sides.

The hand rails were simply moulded plastic and as you can see from the first photo below were fairly ugly and oversized.


So I started by using a 0.45mm drill to drill small holes in the centre of each handle right through the plastic. I then used a sharp craft knife to remove the mouldings before polishing up the plastic using a small amount of T-cut on a cotton wool bud. The result of all this you can see in the second photo.

Having now removed the original hand rails, it was easy to fit a small piece of 0.417mm brass wire into the holes. I used a piece of cardboard to keep the wire away from the surface while I glued it in place. I then trimmed the extra wire from the back and removed the cardboard to give the final result you can see in the third photo.

This turned out to be very easy to do and I think you'll agree that it drastically improves the look of the cab side.

Tuesday, November 6, 2012

Recycled Welsh Plastic

While I definitely enjoyed building the two open coal wagons (here and here) and re-numbering a pug, I would like to move on to building more complex models. My intention is to eventually be able to build etched brass kits of large complex locomotives. The problem is that these models aren't cheap and I'm not sure if I really have the skills to build them well enough to make it worth spending the money on a kit versus buying a ready-to-run locomotive. So while I'd like to dive straight into building an etched brass kit, I'm starting off with a pile of recycled Welsh plastic.

What you can see in this photo is a Dapol pug kit which set me back all of £7.65. It isn't a working model but rather it builds into a static model. It is, however, to the same scale (4mm to the foot) as the rest of my railway models. So once built could be used almost as scenery on a layout. My intention is to use it to practice as many modelling and painting techniques as possible. If I mess it up so badly that it has to be thrown away I won't have wasted huge amounts of money and will still hopefully have learnt something along the way.

I'm not intending to simply build the kit as it comes; I'm going to hopefully improve it. For example, the handrails are molded in plastic, I'm going to try removing them and fitting brass replacements. I'm also going to try fitting a proper handle to the smoke box door, and possibly remove the extra sandboxes from the running board. If I manage to build a reasonable model then I'm also going to practice painting techniques that I didn't use on the coal wagons, such as weathering. There is going to be lots of small parts, lots of drilling small holes and hopefully it's going to be a lot of fun. There will of course be blog posts as I go so you can all share in my triumph/disaster (delete as appropriate).

Saturday, October 20, 2012

A Roundhouse In A Square Building

You may remember that about a month ago I went to Model Rail Live at Barrow Hill Roundhouse. I intended to do a follow up post explaining what a roundhouse is, but unfortunately I forgot. So... essentially a roundhouse is so named because it contains a large round hole!

A roundhouse is a building containing a turntable that is used for servicing locomotives. Because they are built around a turntable (i.e. a big circular hole) they are often circular in shape. Barrow Hill Roundhouse, where Model Rail Live was held, is actually rectangular in shape, which just goes to show that not all roundhouses are round.

When I went to Barrow Hill, half the roundhouse contained diesel locomotives and half steam locomotives. Given my preference for steam, and the lack of a very wide angle lens, the photo on the left shows part of the steam side of the roundhouse.

Friday, October 19, 2012

Etching A New Identity

I finished the last post with a teaser for this post, in that I had a solution to the problem of two Lancashire & Yorkshire Railway (L&YR) pug locomotives bearing the number 19. The answer to the problem is Narrow Planet.

Narrow Planet specialises in making scale name and makers plates in etched brass. While they have a wide range of styles you can choose from they didn't have L&YR makers plates. Steve, the owner, is, however, more than happy to make up custom artwork for etching any type of name or makers plate you may need.

While I didn't have ready access to an actual L&YR makers plate (this all happened before I went to Model Rail Live and saw number 1300 in steam) it turns out that Barry C. Lane's excellent book includes a full page just on the shape, style and dimensions of the L&YR works plates. While most pug's used the same makers plates as all other L&YR locomotives, the final 20 built in 1910 were fitted with slightly smaller plates; just 22 inches wide instead of the full size 25.5 inch wide plates. So armed with this information I knocked up rough drawings for both plate sizes on the computer. Steve then used my rough drawings along with the information from the book to produce artwork that could be used in the etching process. As you can see the results are spectacular.

The full size plate (number 730) was etched mostly as a test but I do have long range plans for it. The small pug plate, however, was etched as number 8 quite specifically. I'd started the process of getting these plates etched before I knew about Dapol's standard model of number 19. My original intention had been to try and repaint and re-number Hornby's current model BR 51240, which was the first model pug I showed you way back in July. If you remember that post I pointed out that 51240 was built in 1910 and originally bore the number 8. However, when I got hold of the docker's umbrella model, it became clear that I would find painting the red lining by hand almost impossible. At that point my plan was to simply paint the model black and leave off the red lining. Of course plans changed when I ended up with two models of number 19.

Here you can see the successfully re-numbered model. I say "successfully" although I'm not entirely happy with how it turned out.

It turns out that the transfer of the number 19 plate is a little over sized for the model (Steve and I were quite careful about sizing the plates accurately), and would show around the outside of the replacement etched plates. Unfortunately I couldn't get the transfer off without using T-Cut, which although it removes transfers and paint well results in a very shiny surface which I would have had to cover over.

In the end I decided to try and paint out the old plates and then attach the new plates on top. This would leave just a small amount of new paint around the plate which I didn't think would be too obvious. So I carefully painted out the outside of the old plate, leaving the central area alone so that I could glue the new plate to the model rather than to new paint. This seemed to be working perfectly until I actually tried to glue the new plates in place.

I'm guessing that when the model was originally painted the surface was sealed in some way (which might explain why I had problems removing the old number plate), but unfortunately whatever they had used reacted badly with the superglue I was using. It set instantly on contact with the plastic and worse it bubbled up and turned white. The fact that it'd tried to reposition the plate slightly meant that I'd also managed to smear glue in slightly the wrong place. Let's just say it was a bit of a disaster.

In an attempt to rescue the situation I removed as much of the glue and paint as possible to try and bring back a mostly flat surface. I then glued the plates back on, taking care to get them right first time. I then painted the now badly scratched panel black (taking care not to go over the red lines). Of course the matt black paint wasn't a good match for the original plastic surface, so I then brushed on a thin coat of satin varnish. While the finish isn't a perfect match for the rest of the model it's not too bad; you certainly can't tell from a distance.

While my modelling skills may leave a lot to be desired I think we can all agree that the etched makers plates are fantastic. The L&YR plates aren't listed on the Narrow Planet website but if you contact Steve he'll be more than happy to etch you a set.

Wednesday, October 17, 2012

Seeing Double

I've mentioned a few times (at least here and here) that there weren't any ready-to-run locomotives painted in the livery of the Lancashire and Yorkshire Railway. It turns out that this isn't entirely true. I've already shown you one limited edition example in my post on The Docker's Umbrella. If you remember correctly this was a limited edition model from Dapol (I own number 18 of 100). It turns out that Dapol actually produce a standard version as well.
As you can see the model is essentially the same as the Docker's Umbrella version but without the smoke deflector and the number plate on this model is a simple transfer unlike the embossed version on the limited edition model. Also this model has of course been given a different running number and represents number 19. Number 19 was built in May 1910 and became number 11243 under LMS numbering before being withdrawn in September of 1931. As with the other Pug models I own, it needed the pickups bending before it would smoothly manoeuvre over the points, but once that was done and a touch of oil added to the moving parts, it's running perfectly.

The only problem is that all the standard models Dapol produced were numbered 19 and I now own two of them (both picked up cheap on eBay), hence the seeing double title. Don't worry though I have a plan to solve this problem, but that will have to wait for a later post.

Wednesday, October 10, 2012

Liveries: Lancashire & Yorkshire Railway

In one of the early posts on this blog I looked into the liveries of the different railway companies who had, at one time or another, run steam engines into Penistone. In that post I only highlighted the main colour of each livery rather than showing the sometimes intricate liveries in detail. Unfortunately there aren't any/many ready-to-run locomotives available for a number of relevant railway companies and so at some point I might need to re-paint some models. At that point I will need the full livery details. So I'm intending to do a number of posts where I look at a livery in detail, and I'm going to start with those used by the Lancashire & Yorkshire Railway, or L&YR for short.

In the early years of the L&YR a green livery was applied to it's locomotives. I'm going to focus, however, on the black livery which was in use from the 1880's until the L&YR ceased to exist in 1922.

Over the years there were a number of minor variations in the livery, but essentially passenger locomotives were black with red and white lining, while goods engines used just red lining. For example, here is the preserved Aspinall designed, 0-6-0 number 1300 which was in steam at Barrow Hill when I attended Model Rail Live a few weeks ago.


While 1300 was built in 1896, it is currently painted in a variation of the livery which became standard sometime after 1904 when George Hughes took over as the Chief Mechanical Engineer. Prior to this time the two white lines were of different thicknesses (the inner one being thinner).

As I mentioned earlier, goods engines were lined slightly differently with just two red lines. You've actually already seen this livery on an OO Gauge model in the Docker's Umbrella post, but to the left you can see it in use on preserved L&YR locomotive number 752.

This locomotive was originally built as an 0-6-0 tender locomotive in 1881 but was converted to a saddle tank in 1896 (it would originally have looked similar although not identical to 1300). Given it's poor state of repair (it's missing it's connecting rods) it's unclear how accurate the livery is. The red lining appears accurate but there are a couple of anomalies. Firstly the green background to the makers plate originally denoted which company had built the locomotive (Beyer Peacock & Co in this instance) so as to know who to contact when for repairs or spare parts. From the 1890's, however, all makers plates were painted black. Also none of the photos I can find of similar locomotives show the company crest on the side of the cab.

While these two locomotives show most of the livery details quite well you can see a number of other examples (including carriage liveries) on the website of the Lancashire and Yorkshire Railway Trust.

Sunday, September 30, 2012

Polbrock

So while there were a number of full size locomotives on show at Model Rail Live last weekend, it was of course a model railway show so I thought the next post about the event should feature a model layout. According to the programme there were 16 layouts in total, but my favourite, by a long way, was Polbrock.

Polbrock has been built by Chris Nevard and it's construction has been documented in a number of articles that have appeared in Model Rail magazine and on Chris's blog. I thought it looked really good in the magazine photos, but it was even better in real life, and certainly my favourite layout of those on show.


As you can probably tell from the second photo the layout is actually quite small; in fact it's just 2 foot 10 inches long by 1 foot wide. What it lacks in size it more than makes up for in attention to detail. It really is a work of art.

When I started this blog I mentioned that I would probably start with a small diorama to test my modelling skills. I'd assumed that to be interesting to look at and operate a layout would have to include multiple lines or even be a full shunting puzzle layout. Having now seen Polbrock in the flesh I've realised that isn't the case, and I've now got a couple of ideas for single line dioramas of a similar size which, if/when I start work on them, will I'm sure result in a number of future blog posts.

Saturday, September 29, 2012

A Roundhead At A Roundhouse

Last Saturday I spent an enjoyable day at Model Rail Live which, for the third year running, was being held at Barrow Hill Roundhouse.

I've never been to a model rail show before (although as a child I remember seeing fixed layouts in a number of places) and so wasn't quite sure what to expect. I did know, however, that Model Rail Live like to distinguish themselves from other similar events by having real engines on show and in use as well as the models.

I wasn't surprised, therefore, when the first thing I actually saw was Britannia class 70013, Oliver Cromwell -- named, of course, after the most famous of Roundheads. The engine was built in 1951 and was removed from service on the last official day of steam on the British Rail network in 1968 when it was one of the engines to pull the Fifteen Guinea Special.

There were too many locomotives and layouts in many different gauges to cover them all in a single post, so expect a few more posts as I work through the photos.

Sunday, September 23, 2012

Lasers On A Train

On Wednesday I was waiting in Sheffield station for my train home from work when this Netwrok Rail maintenance train trundled through. Normally the maintenance trains aren't particularly interesting to me (they are after all diesel powered) but the number of laser warning labels stuck to this one caught my eye.

Apparently it's an optical structure gauging train, which I'm guessing means it uses lasers to check that the rails are still in the right place!

Saturday, September 15, 2012

Standard Gauge Transfers

I thought it was stressful enough adding transfers to the two OO gauge coal wagons (here and here) I built, I can't imagine how sressful it would be to be responsible for adding them to a full size passenger coach!

Wednesday, September 12, 2012

A Naked Duck

Having recently been on holiday and then having to spend time catching up on work that had built up while I was away I haven't had time to do much modelling for quite a few weeks. Of course this blog isn't just about modelling so for this post I'm going to delve back into my childhood, via some of my Dad's photographs, so get ready to behold a naked duck.

After Flying Scotsman the UK's most famous steam engine is probably LNER 4468; more commonly known as Mallard. On the 3rd of July 1938 Mallard was recorded reaching a top speed of 126mph breaking the world record for a steam locomotive; amazingly that record still stands. Next year will see the 75th anniversary of that record breaking run and while Mallard will be given a cosmetic overhaul she will, unfortunately, remain stuffed and mounted as a static exhibit at the National Railway Museum in York. Things were, however, very different in 1988 when Mallard celebrated fifty years since her record breaking run.

Preparations for the 50th anniversary started in the early 1980's as she was slowly restored to working order. By the 28th of September 1985 she was once more raising steam as these photos show.


I love these photos as although they show what a sorry state Mallard was in at the time (the rust marks on the tender are shocking) they allow you to see that underneath the streamlined casing the A4 Pacifics are in fact very similar to other steam engines of a similar size. She has a tubular boiler, smokebox door and (in this case) a double Kylchap chimney. I don't actually remember this trip to the National Railway Museum but I know I was there as I actually appear in the left hand photo; I'm the small blond haired child being lifted up by my mother in the middle at the bottom of the photo.

By the 25th of March 1986 the overhaul was complete and Mallard returned to mainline duties pulling a special train from York to Doncaster via Scarborough and Hull. Looking through my Dad's slides I can see that we saw her at York two months later on the 25th of May pulling the Scarborough Spa Express and then again on the 25th of August when the photo to the left was taken. Here you can see Mallard, again pulling the Scarborough Spa Express, racing out of York towards Scarborough; you can just see the National Railway Museum through the bridge.

It's a shame that such an evocative sight won't greet those people who visit York next year for the 75th anniversary of the world record. Deciding to overhaul and return an iconic engine to steam is always a difficult decision to make. A full overhaul often involves replacing large parts of the locomotive that cannot be repaired (often the boiler) and there will come a time when little of the original locomotive remains. When Flying Scotsman finally returns to mainline steam duties very little of the original engine will remain, and I guess the National Railway Museum have taken the view that retaining Mallard as a static exhibit is preferable especially as there are a number of other A4 Pacifics currently in operation and certified for use on Britain’s mainline railway network.

Note that a lot of the information for this post came from Don Hale's brilliant book Mallard: How The 'Blue Streak' Broke The World Speed Record which I can heartily recommend for anyone who wants to know more about this wonderful and historic locomotive.

Tuesday, August 21, 2012

Henry de Lacy II

If you've been reading this blog since the first post, or have read the relevant posts on my other blog, you will know I have a fondness for Flying Scotsman. Now you may thing that if, as a child, I was going to have a photo of a steam train on my bedroom wall that it would be of Flying Scotsman. You would, however, be wrong. The photo on my bedroom wall was of Henry de Lacy II.

My Dad took the photo, and thanks to my Mum careful labelling each slide, I know that it was shot on the 16th of April 1983 at Middleton Railway; note that the slide is in better condition than this image gives it credit, but as my Dad has borrowed my slide scanner this was scanned using the slide adaptor on my flatbed scanner which doesn't produce particularly good images. I'm not sure why this particular photo should have ended up on my wall but it could actually be the first steam engine I saw in the flesh. Of all the slides of steam engines my parents have recently given me (and which formed part of the inspiration for this blog) it's got the earliest date so there is a good chance this was taken on my first trip to a steam railway.

Henry de Lacy II was built by Hudswell Clarke and Company in 1917 for use at Kirkstall Forge in Leeds where it spent it's entire working life. Apparently it was the second of four locomotives to be named after Baron Henry de Laci of Pontefract, who, in 1152, allowed Cistercian monks to found an abbey adjacent to the site of Kirkstall Forge. Interestingly it is the only locomotive at Middleton Railway to have arrived under it's own power having used the mainline network to travel from the forge to the railway when, in 1968, the forge donated it to the railway.

Henry de Lacy II can still be found at Middleton Railway, although now as a static exhibit in the engine shed -- if you take care to follow the health and safety notices you can even visit it's cab. Looking at the old photo I think it was probably a static exhibit back in 1983 as there is a board placed across the chimney. Either way it's actually looking a lot better now after a new coat of paint.

Monday, August 20, 2012

The Dining Car

Back in 2010 we had a railway themed holiday based in Inverness. One of the places we visited was the Strathspey Steam Railway which runs for ten miles along the route of the old Highland Railway from Aviemore to Broomhill. On the day we visited it was raining heavily but even so the views from the railway are spectacular. Given that it was wet and cold the offer of tea and coffee on the train was both civilized and very welcome. Of course the surroundings for our coffee were not quite as spectacular as on the other train at Aviemore station.


The Royal Scotsman was obviously doing one of it's expensive rail tours, and while it was only half past three in the afternoon the tables had already been laid for the evening meal. I'm sure it's a wonderful way to see Scotland, but it's well out of my price range!

Saturday, August 18, 2012

A Steam Powered Elephant

When we visited Middleton Railway for their 200 Years of Steam gala, as well as a number of visiting old locomotives they also had a steam elephant on show! This steam elephant is actually a working replica of a very old locomotive.

Current thinking is that the original was built in 1815 by John Buddle and William Chapman for Wallsend Colliery which was situated on the north bank of the River Tyne. Details on when it was built and how it worked are sketchy as it is only known from a few paintings. This replica was built at Beamish for use on the Pockerley Waggonway.

I did take a short video clip of it moving, but it didn't turn out very well (I forgot that the expensive camera I own takes rubbish videos, while the cheap camera takes excellent videos) so I'm not going to show you it in motion. Suffice it to say that it's by far the strangest looking steam engine I've ever seen.

Wednesday, August 15, 2012

Working In The Wild West

In my previous post I showed you one modification that had been made to the L&YR 0-4-0ST, aka the "Pug", in order for it to work under the Liverpool Overhead Railway. Well today I'm going to cover the other modification, one which was needed to allow the pug to work in the Wild West Aintree.

In 1916 one of the places the pugs were being used was the munitions factory in Aintree. Now the last thing you want in a munitions factory would be rogue sparks from the chimney of a steam engine. The solution was to fit wild west style spark arrestors. Given that I have a model of a pug with a smoke deflector I thought I'd try and produce one with a spark arrestor as well.

I found two photos of the engines with spark arrestors fitted and used these to build a model version in 4mm to the foot scale to match the Hornby model I already owned. Here you can see the photos I used for inspiration as well as similar shots of the completed model.


It's not a perfect model but as a first attempt I'm happy with how it turned out especially as it involved something I've never tried before: 3D printing. I used Blender (a free, open-source 3D modelling application) to create a 3D model based upon the two photos. I then uploaded the model to Shapeways, and ordered a printed copy which I then painted. Here you can see the step-by-step photos: a computer rendering, the printed object, primed ready for painting, and the final painted item.


While I'm happy with the shape, there are a number of things wrong with the final model. Firstly as you can probably tell from the second and third images the sides of the model are very rough. This is an unfortunate side effect of the printing process. Because of the fine detail (remember the whole model is just 15mm tall and 12mm at it's widest) I had to print it using the Frosted Ultra Detail material. The printing process essentially creates the object in layers by depositing small amounts of material which are then hardened before the next layer is printed. Where there is an overhang, a wax substance is deposited to provide support. This is then melted away after printing has finished to leave the final model. The problem is that this can cause slight pitting to the surface of the model. If you look closely enough you can see that the top of the model is smoother (it's almost see through in the second image) because it didn't require support material. So as the top covers a smaller area what I'll do when I print it again is flip the 3D model upside down so that the large sides don't require any support material.

The main problem though is that I badly messed up painting it and actually broke off some of the finer detail. Everything was going well to start with. I'd washed it in some strong washing up water to remove the last traces of the wax and then primed it using an aerosol (the same as I did the wagon I built recently). This worked well and allowed me to see the finer detail better than on the plain model. Unfortunately i then made the mistake of trying to spray paint it black and ended up with way too much paint, so much so that I obscured all the detail. I stripped the paint back (neat detol works well for this even if it does stink), but in the process the clasps on either side broke of. Now given how tiny they are I'm not really surprised. I then re-painted the model by hand but then compounded the problem by trying to spray on some satin varnish only for lots of white dots to appear (this happened with the black wagon as well, although not the red one so I'm wondering if it's the black paint that's the problem not the varnish). So in the end I've repainted it by hand and forgone the varnish, which means it's gloss instead of matt. So I will at some point have another copy printed and will try again to paint it properly.

Even with the painting disaster I'm happy with how it turned out. I'm sure I'll show you it again when I've had it re-printed but as the postage costs mean you really need to order multiple items (or much larger items) it will have to wait until I have something else I want to print -- I have some other models that I'm working on but some of them are proving a little tricky to finish.

Monday, August 13, 2012

The Docker's Umbrella

The L&YR built 0-4-0ST, AKA the "Pug", which I blogged about before, was such a versatile shunting engine that it could be found in a number of locations across the railway network. When working in some locations though it had to be modified slightly.

As far as I know there were two main modifications made to these locomotives but today I want to talk about just one of them. As you can see in this photo (lifted from Wikipedia) a metal disc on a pole has been fitted to the front of the locomotive. The disc could actually rotate and would normally have been seen positioned directly over the chimney. The idea being that it would reflect the smoke back downwards onto the engine. In general this seems like a daft idea; you usually want the smoke to clear upwards and out of the way so that you could see where you were going. There was, however, one place where it was desirable to try and keep the smoke from wafting upwards -- Liverpool Docks.

Now I doubt the dock workers really wanted to be surrounded by lots of steam and smoke reflected back down at them, but criss-crossing the docks was the Liverpool Overhead Railway. How do I know that's the reason for the smoke deflectors being fitted, well an information sheet told me so!

Having said previously that I didn't know of any L&YR locomotive ever having been produced in L&YR livery in OO gauge I then came across an eBay auction for just such a model -- a limited edition of just 100 pieces. As you can see from the photo this is the same underlying model as the BR liveried "Pug" I already own. The difference of course is that it's painted in the L&YR goods livery and with the smoke deflector fitted. As I mentioned before the tooling for this model has passed through a number of hands and while the BR liveried version is sold by Hornby this is actually a Dapol model.

Of course I couldn't resist this model and so I placed a bid for it which turned out to be the highest bid so I do now have at least one L&YR liveried model for my layout. Now the purists will notice that there are a couple of problems with this model. Firstly the smoke deflector isn't really in the right place; it should be a lot higher up and the pole should be attached to the top of the chimney. I'm guessing this was done so it would fit in the same polystyrene box as the normal model and in my opinion doesn't really matter. The more glaring inconsistencies are due to the fact that the underlying model represents the engine from the LMS years onwards when it had a number plate fitted to the smokebox door as well as a second sandbox placed on the running plate next to the tool box. Neither of these would have been present on an L&YR liveried locomotive -- which explains why the number plate is blank!

So what did the information sheet that came with this model say about the smoke deflector:
Because a large section of the Liverpool dock lines ran directly underneath the elevated sections of the Liverpool Overhead Railway and the directors of that company felt that undue amounts of smoke, steam, sulphur and other impurities would cause deterioration of the steel decking.

So why did we christen the model the Docker's Umbrella Pug? Because the smoke deflector did indeed look like an umbrella?

No! The reason is that the Liverpool Overhead Railway which ran close to the dockside for miles was a very convenient shelter from the rain for men loading or unloading the ships.
So now you know.

Sunday, August 12, 2012

Two Or Twice

I realised that while I've spoken at length about the locomotives and rolling stock I can run, that I haven't talked about the actual layout I'm running them on since it was a basic oval with a single siding. So I thought I'd show you the current layout and use this post as an excuse to tell you about a piece of software I've found really useful.

There are quite a few applications that can help you design a layout but of all the ones I've tried only one has turned out to be easy to use and flexible enough to be useful; AnyRail. AnyRail supports most common makes of track in almost any gauge you could want to model in. It also allows you to mix and match track within a single layout which is useful if you have multiple makes of track in the same gauge, or if you want to use different gauges within the same layout (maybe you want to model both a standard gauge line and a narrow gauge branch line). AnyRail isn't free, although you can use it with no limitations for layouts consisting of 50 track pieces or less. Given how good it is I don't think £35 is too much to ask though and I've happily bought a license. It's currently only available for Windows but it runs perfectly under Ubuntu using Wine.

So here is my current layout drawn using AnyRail. As you can see it's moved on a little bit since last time.

Currently the layout is still only layed out temporarily on the dinning table, so I'm limited to settrack (I'd need to pin flexible track down for it to maintain it's shape). Fortunately that means I'm free to experiment and I'm sure I'll be able to reuse most of the track when I eventually get around to building a more permanent layout. Anyway with this layout I was aiming for a number of things. Firstly I wanted to be able to run more than one train at once and as I'm not using DCC this means two separate loops. I also fancied the idea of turning the sidings into a small shunting puzzle. Finally I also wanted a long continuous run for a single train.

Now given that I'm currently limited to a 6 foot by 4 foot board this was asking for quite a lot. In the end I've actually managed to pack everything in. The sidings are very short but using the pug I can actually shunt without moving out onto the inner loop. The two loops can be run independently for two separate trains, but if I set the points correctly then I can have a single train run around one loop and then the other before returning to where it started for a longer continuous run (hence the title of this blog post -- I can have two loops or run twice around). This also has the added benefit of allowing me to easily move trains from one loop to another when required.

I'm not sure how much more I could possibly pack into a temporary layout on a 6 foot by 4 foot board but I do have some ideas!

Saturday, August 11, 2012

Working Brakes

So as I previously mentioned I've been building another coal wagon. This is an 8 plank, 12 ton open coal wagon again built from a Parkside Dundas kit, painted with Humbrol paints and detailed with Modelmaster transfers.

As you can probably tell this was a lot more complex to paint than the all black Lofthouse Colliery wagon. I started by masking off the undercarriage and spraying the top red. I then reversed the masking and sprayed the bottom black. Unfortunately my skills with the masking tape weren't perfect so I used small pots of matching paint to touch up those areas were paint had leaked under the tape. Once this was completely dry I then painted in all the metalwork detail on the upper section in black. Which was time consuming but well worth while.

The transfers still aren't perfect; some didn't even go on straight but wouldn't move without risking tearing them, and from the photo it's clear to see there are still areas where there is air under the transfers. Clearly I'm going to have to work on perfecting adding the transfers, but when viewed from further away than the camera was it looks fairly decent and I'm certainly happy with it.

The one problem, as alluded to in the title, is that the model brakes actually work! I've obviously not quite aligned the brake detail properly and with the extra layers of paint and varnish one set was close enough to a wheel to stop it rotating unless I added more weight to the wagon. I've sanded the break block back and touched up the paint and it seems to be going round now, but I'll have to keep an eye on it and possibly file it back even further.

Yet again the transfers I used were to make the wagon appear local. This time I'm even closer to home. When I take the train to work the first place it calls is Silkstone Common before it heads towards Barnsley stopping first at Dodworth. I'm not sure where the Old Silkstone colliery was but it can't have been too far away.